Learn how to write basic HTML for the web content without all technical jargon.
by Arjan van der Gaag
Countless developer hours are spent developing browser-based writing solutions to make it easy for non-technical people to publish content on the web. Oftentimes, developers try to re-create Microsoft Word on a web page, but such solutions quickly become so complex they need their own manuals. There is a simpler way: just write HTML.
HTML is simple enough to learn, “even” for non-technical writers. This guide teaches you how — using simple tools you already have installed on your computer. This is not a complete reference to HTML, nor a course to learn how to develop your own website. Instead, it focuses on basics needed to write for the web.
Throughout the document, whenever we refer to some code in an HTML file, we’ll display it in a fixed width font. Remarks that offer a little extra background information, but are not crucial to the main text, are displayed in a box like this one.
I hope this guide will make some positive contribution to your workflow and understanding of how the web works. The source code to this guide is available on Github and I’ll gladly take suggestions, corrections and feedback. Enjoy your journey of learning HTML!
You already have all the tools you need to create and view your own HTML documents in a browser. Without hosting it on a server somewhere it will not be visible to anyone other than yourself, but that’s alright.
First, you need a text editor to write HTML. Microsoft Word is not a text editor, it is a word processor. On Windows, Notepad is a text editor. On macOS, you can use TextEdit in plain text mode. Of course, professional web developers use much more sophisticated tools than Notepad to develop websites, but for our purposes, Notepad or TextEdit will suffice.
Second, you need a web browser to view your HTML files. Unless your computer is ancient, it will come with a browser installed. Internet Explorer, Edge, Firefox, Chrome or Safari will all work.
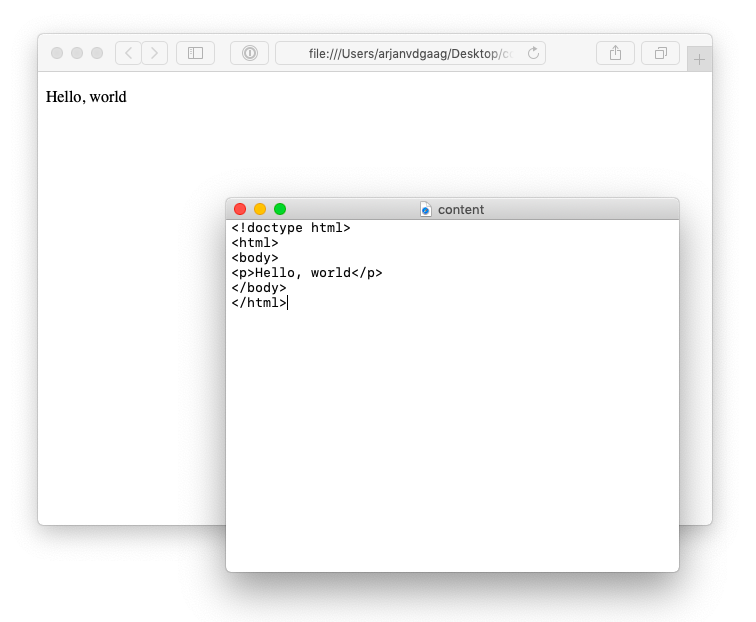
To get started, start your text editor and copy/paste the following code:
<!doctype html>
<html>
<body>
<p>Hello, world</p>
</body>
</html>
Don’t worry about what this all means just yet, we’ll get to that soon!
Once you have pasted the text into your new document, save your document in an easy-to-remember location on your computer. Call it content.html.
Mind the .html extension. Your text editor may ask you if you really don’t want to use .txt as an extension. Tell it “thanks, but no thanks” and stick to .html.
Open your browser of choise and use the menu to open your newly created file. For example, on macOS in Safari, you might choose menu File, then Open File…. Select your file and open it.
You should now see a white page with black text reading “Hello, world” on your screen. Congratulations, you have just created your first web page!
From now on, let’s focus on this line in our file:
<p>Hello, world</p>This line contains a single HTML tag. All HTML documents are made from several tags. In this case, have used the <p> tag to define a paragraph (hence the name p). A tag usually (but not always!) has an opening and a closing: <p> is the opening and </p> is the closing. Everything between these two are called the tag contents, in this case the phrase “Hello, world”. A tag may also contain other tags. The p in <p> is the tag name. We call this a “P-tag” or “paragraph tag”.
Since in HTML the less-than (<) and greater-than characters (>) are used to indicate HTML tags, you cannot just write those characters without leaving the browser confused as to what you are trying to do. Instead, wherever you’d want to write < use < and for < use >. Luckily, we don’t use these often…
You can think of HTML tags as a selection in your word processor like Microsoft Word: you select a piece of text, and you click a button to make that text bold. Your selection has defined a beginning and an end to your transformation, and the transformation you applied was “display everything in my selection in bold text”. HTML works much the same way, with <p> serving as the beginning of our selection and </p> as its end.
We have seen how we can use the <p> tag to mark up a paragraph of text in an HTML document. Paragraph tags are usually displayed with some amount of whitespace before and after the text, like so:
<p>Paragraph 1</p>
<p>Paragraph 2</p>
You might wonder why you would not write a blank line between two paragraphs of text with some actual blank links. Consider this example:
<p>Paragraph 1

Paragraph 2</p>
Note how the blank lines in the code example do not show up in the actual result in the browser. In HTML, multiple consecutive spaces and blank lines are condensed together to a single space. I you really wanted to force a line break in an HTML document (which is not a great practice), you’d use the <br> tag:
<p>Paragraph 1<br>
<br>
Paragraph 2</p>Heading tags work much like the heading profiles in word processors like Microsoft Words: they give a block of text extra visual weight so they can serve as document title or section heading. But on the web, headings serve an additional purpose: they help search engines understand the structure and content of your page, which in turn helps your pages get found.
Headings come in levels one to six, with one being the most important and six the least important. We can use these tags to mark up headings:
<h1>…</h1><h2>…</h2><h3>…</h3><h4>…</h4><h5>…</h5><h6>…</h6>Typically, <h1> is displayed in big, bold letters while <h6> is displayed in smaller font sizes.
You might combine a heading with a paragraph like so:
<h1>Chapter 1</h1>
<p>It was a bright cold day in April, and the clocks were striking thirteen.</p>
Lists are used frequently on the web. Bullets and numbers make it easy for readers to scan the content of your page. HTML gives us two kinds of lists: ordered and unordered. Usually, ordered lists are rendered with decimal numbers, while unordered lists use bullets.
We can mark up ordered lists with <ol> and unordered lists with <ul>. Each list item gets its own <li> tag inside wrapper tags. See how these tag names actually do make some sense?
For example, we might write a shopping list like so:
<ul>
  <li>Milk</li>
  <li>Biscuits</li>
  <li>Honey</li>
</ul>
The steps to a recipe might be better written using an ordered list:
<ol>
  <li>Mix flour and butter</li>
  <li>Bake for 20 minutes</li>
  <li>Let cool off for 10 minutes</li>
</ol>
Note how the lines with the <li> tags are indentend, i.e. starting with two spaces. This is a common convention when writing HTML, although not required.
Headings, paragraphs and lists only get us so far. When writing for the web, we want to emphasise and highlight words and phrases to direct the reader’s attention to it. Just like common word processors, we can apply bold and italic formatting to a phrase using the <b> and <i> tags:
<p>We can use <b>bold</b> and <i>italic</i>.</p>You’re also likely to encounter two alternatives to <b> and <i>: <strong> and <em>. They differ in semantics — with which we will not concern ourselves right now — but usually give your the same result.
Bold and italics are the text styles you’ll most commonly want to apply to text on the web, but there are some others that might come in handy every now and then:
<mark> can be used to highlight a piece of text much like you would do with a coloured marker;<s> can be used to strike through some text.<u> can be used to underline some text — but remember that users browsing the web will expect underlined words to be a link.<code>for displaying some text in a fixed-width font common for computer code.<sup>/<sub> to display text in superscript or subscript.How these tags will be displayed is also very much dependent on how your website has been implemented. You’re going to have to experiment and see what effects they achieve.
There are a few other tags we can use for inline formatting, such as the all-important <a> tag for links. I know you are dying to get to links, but bear with me, we’ll get to them a little further down the road.
Back in the old days of the web, <table> tags were used as a layout mechanism. They got a bad rep, but sometimes, you really want to display a table. Writing tables in HTML is a little more involved, as we need to use several different tags together and put one tag inside another tag — but don’t worry, with a little practice you’ll quickly get the hang of it.
Let’s start with an example:
<table>
  <tr>
    <td>Region 1</td>
    <td>$500</td>
  </tr>
  <tr>
    <td>Region 2</td>
    <td>$400</td>
  </tr>
</table>
We’re using the following new tags:
<table> to define to beginning and end of our table data;<tr> to represent a table row;<td> to represent a table data cell.
Note how <table> contains multiple rows (<tr>) which are displayed top-to-bottom as you write them; while each row contains multiple cells (<td>) which are displayed left-to-right.
This works well enough for simple tables, but it is not uncommon to mark up tables with special header columns:
<table>
  <tr>
    <th>Region</th>
    <th>Sales</th>
  </tr>
  <tr>
    <td>Region 1</td>
    <td>$500</td>
  </tr>
  <tr>
    <td>Region 2</td>
    <td>$400</td>
  </tr>
</table>
Here, we introduce the <th> (table header) element to indicate that the first row of our table has column headers that should be given some visual distinction from the actual data.
Note how we’ve introduced a separate row in the table with just header cells. A common convention in HTML is to mark up different types of rows using three special tags:
<thead> will contain a row with table headers;<tbody> will contain all the rows that form the body of the table;<tfoot> will contain the “header” rows below the table.This might look like this:
<table>
  <theader>
    <tr>
      <th>Region</th>
      <th>Sales</th>
    </tr>
  </thead>
  <tbody>
    <tr>
      <td>Region 1</td>
      <td>$500</td>
    </tr>
    <tr>
      <td>Region 2</td>
      <td>$400</td>
    </tr>
  </tbody>
  <tfoot>
    <tr>
      <th>Total</th>
      <th>$900</th>
    </tr>
  </tfoot>
</table>The tags we have seen so far are intended to add special meaning to what would otherwise be plain text: paragraphs, headings, bold, italic, lists, tables… HTML also supports “generic” tags that convey no special meaning to their contents: <div> and <span>.
Let’s take this example:
<div>Hello, <span>world</span>!</div>The output if this code snippet is not very exciting, and you might wonder what the point to generic tags is. Apart from discussions about semantics and self-describing text documents, there is one important practical application: styling. Generic tags allow us to write text and, without making any claims to document structure or meaning, apply some formatting. This is achieved using Cascading Stylesheets (CSS) and the aid of the class attribute which we’ll see in a minute. We will not concern ourselves with CSS in this guide, but there are some references at the end of the guide to learn more.
Note: although it might not be immediately apparent, there is a difference between the <div> and <span> tags. A <div> tag creates a block-level element, intended to represent a whole block of text, much like heading or paragraph would. A <span> tag creates an inline element, which exists inside a block-level element and usually applies to just a few words, much like <b> and <i>. Although there a some formal specifications on what kinds of tags are allowed to be used where in a document, web browser are quite forgiving and will render most tag combinations just fine.
There are many more HTML tags you can use to mark up blockquotes, navigation aids, form input fields and more. You can find a list of common HTML content tags in the appendix. The best way to learn them is to try them out and see what happens.
So far, we have looked at simple HTML tags. As we spice things up with attributes, we learn how we can implement the quintessential feature of the internet: the link.
href attributeA links allows the reader to click from one document to the next. Along with the page it is the basic building block of the web. Text that is linked together like that is called hypertext, hence the name HyperText Markup Language (HTML)!
To create a link, we not only need to indicate where our links starts and ends, as with inline formatting tags, but also specify where the user should go after clicking the link. We’ll use an attribute for that.
A link can be marked up as follows:
<a href="http://www.theguardian.com">The Guardian</a>Here we have a new HTML tag, <a> for “anchor”, to define which words in the text are clickable in order to lead the reader to the website of The Guardian. We introduce the href (hypertext reference) attribute. In HTML, we say that we have an a tag with an href attribute that has the value http://www.theguardian.com. A couple of rules apply:
a and the attribute name href.= between the attribute name href and its value.In the example, we link the user to a completely different website. We can also write links to pages on our own site. To do so, we can omit the domain name from the internet address. For example:
<a href="/contact">Contact us</a>In this example, we use a relative address. Assuming our web page is accessible at http://example.com/index.html, this links would take us to http://example.com/contact. If instead it was accessible at https://www.mysite.com/pages/home, this link would take the reader to https://www.mysite.com/contact. The domain name remains intact, but that part after .com is changed.
src attributeMuch like we can add links to a document to point at another web page, we can also refer to external images, such as a photo or a holiday picture. To do this, we use the <img> tag (for “image”). This tag is remarkable, because it is the first one we have encountered so far that does not take any content. Instead, it solely depends on the value of its src attribute:
<img src="http://placekitten.com/200/200">The src attribute (for “source”) has an internet address, either absolute or relative, to an image that the browser will display wherever we write this tag. If you want, you can specify the dimensions of the image in question, which is particularly useful if you want to display a large image in a narrow column of text:
<img src="http://placekitten.com/200/200" width="100" height="100">
The browser will scale, squeeze and stretch the image to display it in the dimensions indicated by the width and height attributes, measured in number of pixels. Note that non-numeric values will be ignored, and that you might very well distort your image by writing the wrong dimensions:
<img src="http://placekitten.com/200/200" width="100" height="300">
You can omit the widht and height attributes to let the browser display the image at its full size.
The final attribute we need in our toolbox is the class attribute. It is a humble attribute, in that it basically does… nothing. Browsers will commonly ignore the class attribute, allowing us, the author, to put anything we want in there as a value. For example:
<p class="leader">Welcome to my site</p>Now why would we want to do that?
Classes are used to give some special meaning to our HTML tags. In the above example, we indicate that our paragraph of text is not just like any paragraph of text, but it is a special kind of paragraph, called a leader (a term borrowed from the publishing industry). Developers can use the class attribute to customise the formatting of an element on the page. For example, we might choose to render a “leader” paragraph slightly bigger and in a different colour from other paragraphs, so it draws the reader in.
The class attribute might contain anything, but developers commonly treat it as a list of keywords separated by a space. For example:
<p class="intro bigger red">Introduction</p>In this case, we have indicated that this particular paragraph of text should be displayed in a bigger font size and in red, and that it is a special type of “intro” paragraph. Note that browsers will usually ignore the class attribute; it is only through applying custom styles using cascading stylesheets that they will have any effect. As such, different classes can mean different things on different websites. Check with the developers of your website what classes you can use in your HTML!
You are now well underway to writing content for the web using HTML. There are many more HTML tags, conventions and gotchas to learn about than what we have reviewed here. In order to build your own websites that look great, are accessible to all users — including those with disabilities — and are a delight to use, there is lots more to explore. I recommend the following resources:
A great way to see some more examples of HTML in the wild is to study the HTML documents others have made. Most browsers include tools to inspect the source of the current page. For example, in Google Chrome, you can right-click in any HTML page and click View source… to see the HTML code for that page. In Safari, you’d first have to enable web developer tools under Preferences » Advanced » Show Develop menu in menu bar, after which you can right-click in any page and click Show page source.
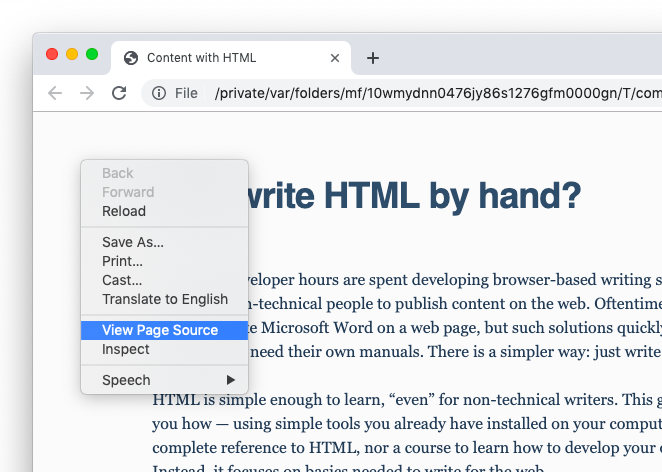
The HTML code you will see in live websites contains many more tags than what we’ve seen in this tutorial, along with inline stylesheets and javascript code. Don’t let that put you off; instead, think of it as more to explore! Go ahead and try it on this very web page.
Writing HTML code is all well and good, but if you’re serious about creating your own websites in stead of mere HTML content for existing sites, you will have to give your HTML some style. Cascading stylesheets (CSS) give you that capability. With CSS you define rules about how certain elements should be displayed, depending on their HTML tag or place in the document.
An example of including some CSS in your HTML page would look like this:
<!doctype html>
<html>
  <head>
    <style>
      h1 {
        font-size: 18px;
        color: red;
      }
    </style>
  </head>
  <body>
    <h1>Example</h1>
  </body>
</html>
Here, we declare that text in an <h1> tag should be displayed in red using a font size of 18 pixels.
There‘s a lot more to learn about CSS with many good books and websites available to learn, so go explore and learn! A good place to start is:
The following is a table of the most important and commonly used HTML elements for writing content.
| Tag | Description |
|---|---|
<a href="url">text</a> |
Make text clickable, sending the user's browser to url. |
<p>…</p> |
Show its content as a paragraph of text, usually surrounded by blank lines. |
<h1>…</h1> |
Mark up level 1, or the biggest, headings. |
<h2>…</h2> |
Mark up level 2 headings. |
<h3>…</h3> |
Mark up level 3 headings. |
<h4>…</h4> |
Mark up level 4 headings. |
<h5>…</h5> |
Mark up level 5 headings. |
<h6>…</h6> |
Mark up level 6 headings. |
<ul>…</ul> |
Show enclosed li elements as bulleted list. |
<ol>…</ol> |
Show enclosed li elements as numbered list. |
<li>…</li> |
List item in a ul or ol tag. |
<strong>…</strong> |
Display text in bold formatting. |
<b>…</b> |
Display text in bold formatting. |
<em>…</em> |
Display text in italic formatting. |
<del>…</del> |
Mark text as having been deleted. |
<ins>…</ins> |
Mark text as having been inserted. |
<mark>…</mark> |
Mark text as highlighted. |
<u>…</u> |
Show text with underline. |
<s>…</s> |
Show text with strike-through. |
<code>…</code> |
Show text as computer code. |
<blockquote>…</blockquote> |
Mark up containing p elements as quotes. |
<br> |
Force a line break. |
<hr> |
Display a horizontal rule. |